

I would like to invite you to visit my new blog site. It is called The Photographers Code and can be found hear http://thephotographerscode.com.
I also invite you to visit my photography site, Grinke Creative Inc. and can be found here. http://grinkecreative.com.
The content here is still great so I also invite you to review it.
Monday, January 5, 2015
Monday, October 21, 2013
The X Factor
The following article was written for my Web site about 2 years ago. I am moving the articles on my Web site over to my blog so here is the first one.
Enjoy
The X Factor
Lens conversion factor came into play early in the digital imaging revolution. It was developed as a way for 35mm shooters to know how the perspective of their lens would look on a digital camera. To get an idea of how it works, imagine a 4x6 print. Now draw a box on the picture about 2cm in from the edges. The 4x6 print represents the full size sensor(or 35mm film) while the box inside represents the sensor in your camera, (or any other digital camera). Keep in mind that this is only a representation and not dimensionally accurate. If you were to enlarge the part of the picture inside the box that you drew to a 4x6 print, it would appear as though it was taken will a longer lens. The X factor is a ratio of the sensor size relative to the full size sensor (or 35mm film). There are many different size sensors out there so the x factor be different depending on the cameras that you are using.
On a digital SLR like the Canon Rebel XTi, the X factor is 1.6. I usually use 1.5 because the math is doable in my head and the difference is not significant. Therefore, a 50mm lens will give you the same perspective a 75mm lens on a 35mm camera (50 x 1.5 = 75), a 100mm lens will give you the same perspective as a 150mm lens on a 35mm (100 x 1.5 = 150), and so on. So, the X factor is really just a conversion to give lens magnification on a DSLR relative to a film SLR or Full Size sensor DSLR.
Interesting to note that photographers had this similar issue before digital as well. There are many other film formats out there besides 35 mm and each one requires different focal length lenses to achieve the same effect.
The zoom factor is a ratio of the longest focal length of a lens divided by the shortest focal length of a lens. It is not particularly relevant for a DSLR because the lenses are interchangeable and the zoom factor will be different depending upon the lens.
So lets do some calculations. The zoom factor for a 18mm - 55mm lens is 55mm/18mm=3 or 3x optical zoom. Calling it optical zoom is somewhat redundant because we are talking about a lens which is only optical but eh. The zoom factor for a 50mm - 200mm lens is 200/50= 4 or 4x optical zoom. The zoom factor for a 75mm - 300mm lens is 300/75=4x or 4x optical zoom. And on it goes. You can use the X factor to recalculate the relative focal lengths but it won't change the answer so why make life more confusing.
In the world of fixed lens cameras and point and shoot cameras this is great to know because you can get an intuitive idea of how a camera will respond. For example; a canon SD1000 has a 3x optical zoom with its widest angle being 38mm equivalent. Using the zoom factor ratio we can determine that when it is fully zoomed out it will have the equivalent of 38mm x 3 = 114mm lens on a 35mm camera. On a super zoom such as the Olympus 550UZ, the zoom is 18x and starts at a 35mm equivalent of 28mm. Therefore when zoomed fully out it will have a 35mm equivalent of 28mm x 18 = 504mm.
With a DSLR, the lens is interchangeable, and each lens will have its own zoom factor as shown earlier in some of the calculations. What happens when you have more than one lens in you camera kit? Do you have different lens with different focal ranges and different zoom factors or do you a series of lens that will take you through an expanded zoom range and a zoom factor that encompasses you entire kit? There is no definitive answer to this but I prefer to view my camera as a system and therefore would look at it as a zoom factor that encompasses the entire range of my lens. Using this logic then, lets recalculate the zoom factor for a DSLR kit.
Lets assume that you have an 18 - 55mm lens that comes with the camera. Then, as calculated above, you have a lens with a 3x optical zoom starting at 18mm. Now assume that you decide to purchase a 55 - 200mm lens. As calculated earlier, this lens is a 4x optical
zoom. But in your kit you now have lens ranging from 18 mm to 200mm, so effectively, you
have the capability of 200mm/18mm=11 or 11x optical zoom starting at 27mm equivalent
(18mmx1.5=27mm). Interesting huh?
Sunday, September 29, 2013
Return from Hungary
I have been back from Hungary for over a week now and I am still sifting through images. Wow, what a great trip and such a wonderful place to visit. The photographic opportunities are amazing and the people are very warm and welcoming.
 |
| Gellert Hotel, Main Entrance Canon 6D, 24-105@24mm, 1/20@f4, ISO 1600 |
This is the Gellert hotel where we called home for the duration of the trip. It is built in 1916 and contains the world famous Gellert Spa. The building is filled with history, being the home away from home for the leaders of the German army during WWII and then by the Soviet Union. The spa area was, during the Soviet occupation a public swimming pool for the people of Budapest however the hotel itself was off limits. As the story goes, only tourists and Russians were allowed in the hotel area.
The building itself is an incredible piece of architecture and the public areas a well maintained and have kept the original feel of the building. The rooms are comfortable but show signs of long term neglect and patch it so it works and that's good enough repairs. I suspect there are plans in place to bring the hotel back to its original glory. I very much enjoyed my stay there.
 |
| The indoor pool at the Gellert Spa. Canon 6D, 24-205 @24mm,1/30 @ f4.0, ISO 2000 |
 |
| The Freedom Bridge leading to the Gellert Hotel Canon 6D, 25-105@45mm, 2.5 sec @f5.6, ISO 160 |
 |
| The Freedom Bridge Canon 6D, 24-105 @ 55mm, 1400@ f5.6, ISO 160 |
 |
| The Chain Bridge HDR Composite |
Len
Friday, August 23, 2013
Lifestyle portraits and teenagers
Some of my favourite people to work with are teenagers. There curiosity and willingness to try things make photographing them a delight. The images in this post are from a recent lifestyle portrait session that I did at Kates Park in North Vancouver. It was close to sunset, maybe an hour before, when these images where taken. Although they were done at about the same time and same place, two very different techniques were used to capture the images.

The first image was taken in direct sunlight. The subject was turned so that her back was facing the sun. When photographing a portrait in direct sunlight, I work at having the subject between the sun and the camera. This technique gives the beautiful rim light that I have in this portrait and allows me to control the light on the face.
When taking this portrait, the sun was low enough to cause flair in my image that I did not like. to correct this, I moved to be at a slight angle to the sun - correcting the flair problem. A reflector was used to control the light back into the face.
Post production was in Lightroom. To soften the entire image, I used the clarity slider and then added some grain. I also wanted to have a lighter feel to the image so I used the split toning feature to create a look that appeared to be more of a morning light. I have also made some skin tonality adjustments using the luminosity sliders. finally a light vignette was added. I liked the effect so I made it into a Lightroom preset.

The second image was taken about 15 minutes later at a different area of the park. I am facing North East here and the sun is low in the sky - on the other side of the park. As a result, there is sun shining across the water lighting the boat and the opposite shoreline, but the beach we are on is being shaded by the trees.
To get this image, I set my exposure for the background. I wanted to show off the beauty of the setting so I needed to insure that it did not disappear. If I had exposed for the subject, the background would have become very overexposed. By exposing for the background, I put the subject in dark. This gives me the advantage of being able to control the exposure on the subject using Flash. I put two 580 EX 11 flashes in a 40" umbrella and balanced the exposure on the subject to the exposure on the background. The final exposure was F 5.0 @ 1/200th, ISO 200 on a Canon 7D. Lens 10 - 22mm set at 21mm.
Final touches in Lightroom were minor skin tone adjustments and a vignette.
This session was a lot of fun and I know the client had a great time as well. We had a lot of time to try some different things and to just play, and the result were well worth it.
Saturday, August 10, 2013
Lake time
It's lake time once again, and the first thing that gets packed into the truck is the camera gear. It's a force of habit I know, but I don't think I have ever gone to the cabin, our any place else, without it. It's a part of me and in many ways it is who I am. It's been this way for years now and it is likely to never change.
I always enjoy going to the cabin and one of my favourite things about it is that there is always something to tinker with. Something always needs fixing. This trip had a couple of minor issues, the door on the dishwasher was out of kilter and some general clean up of the property, but there was one larger issue to take care of. The effluent pump was not working!
When we arrived, my brother in law had already determined that the problem was not actually the pump but a problem with the power supply. We opened up the electrical box and discovered a corroded mess. All the wires had corroded to the point where the wire needed to be replaced all the way from the box in the cabin out to the sump area where the pump is.
As is the case at the lake, a major problem such as this requires a beer and consultations with the rest of the cabin community. As we were approaching the need for a second beer, our close friend Kent say "hang on, I think I get some BX cable at the cabin". 10 minutes later he's back with his son in law who happens to be an electrician, and guess what, he's got his tools with him and all the parts we need to do the job. An hour later, the pump is back in business and everyone is one again able to do their business.
Our electrician friend was a true professional. In his mind, there was no question that he would have his tools with him. They are what he does and they are a part of him. He also wanted to help. You could see that being able to use his craft gave him joy. What a wonderful gift.
As photographers, we need to see our cameras in the same light. They are the tools that we use to do our craft. I could not come up to the cabin and be comfortable without my camera. The interesting thing is that every time I come up, I have occasion to use it. And every time I come home with some different images.
Saturday, August 3, 2013
Photographing in a Alley

The photograph attached to this post was taken in a very narrow lane in downtown Vancouver. Sometimes, if you work near the end of the lane, you can get directional lighting, however, this stretch of wall was in the middle of the lane, giving only top down lighting t work with. The existing lighting would have created very dark shadows under the eyes resulting in a generally unpleasing image. A quick solution would have been to pull out a reflector and shine some light back into the shadowed areas, however, this would have also light up under the nose and chin, a look that I am not particularly fond of. I felt that a better solution was to pull out the flashes.
My primary light source was 2-580EX2 flashes placed inside of a 2x2 Apollo soft box. The light source was placed to camera left. The exposure was set to balance the ambient light. Balancing the flash with the ambient minimized shadows on the wall and careful placement of the light and subject all but eliminated them. The net result was a portrait that looked natural yet still light the mask of the face.
This image was taken with a Canon D6, 70-200 IS f2.8 lens at 200mm, f 5, ISO 800, shutter speed 1/60. The image was finished in Lightroom with a vignette.
Monday, July 22, 2013
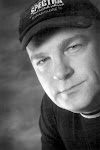
Five Lights and Two Reflectors

Sometimes, what appears to be a simple image can prove to be quite complex from a lighting perspective. The image accompanying this post appears as a straight forward head shot. However, it took five lights and two reflectors to create the lighting that I wanted. Here's how I put this lighting together.
The primary light source, the one lighting the face, is a 3ft x 3ft soft box placed almost directly above the camera. The lighting pattern this gives on the subject is a butterfly style of lighting. Even though the light source was large, the shadows created on the face were still a little to deep. By using two reflectors below and on either side of the camera, I was able to direct light into the shadow areas that I wanted to open up. I have at times used a single reflector directly from underneath, but I found that I did not have as much control over the placement of the light.
To add depth to the image, I put a light on the background. It is very important to make this light as subtle as possible. Too bright and it becomes distractive, too dark and you will not get the separation.
This subject has very dark hair. The danger with very dark hair is that if it is not properly light, it will blend into the background and have no detail - it will just be a black, flat area in the image.. To light the hair properly took three lights - one directly from the top and one from each side. the lights were placed behind the subject with lighting controls that allowed me to carefully aim the light source and prevent the light from flaring the camera.
Five lights and two reflectors to create this head shot. But the results are well worth it.
Subscribe to:
Posts (Atom)