As a portrait photographer working primarily on location, I am constantly faced with the challenge of creating studio lighting on the go. Of course the obvious solution is to bring studio lighting with you and set up when you get there. But who wants to do that. I drive a sports care, not a moving van, and I don't really want to spend my day setting up and breaking down all that gear. The solution that I use is to combine existing or ambient light with off camera flashes to create the effect I want.
A typical assignment for me is to go on location and photograph a business portrait. The lighting gear I would take with me would be 2-580 EX, 1-430 ex,a STE2 to trigger them, a reflector 2-32" umbrellas and 2 stands. (I use Canon gear but the technique can be used with any stobes set up to be fired remotely.) The only things that add extra bulk to my camera kit are the stands so I make sure to use the lightest ones I can get away with.
Here's how I put it all together.
The 2 580 ex flashes are put on the stands with the umbrella's. If needed, the 430 ex is used for background seperation but it is seldom used. For a portrait, one strobe is used as the key light, the other is used as a hair light. Fill is from a reflector.
To get the exposure, use the camera meter to get a ambient light reading. Set the strobes to put out the same exposure. I prefer to use manual settings bit ETTL can work as well. This is the basic setup. What is really cool about this is that by changing the shutter speed, you can lighten or darken the background and shadow areas. Increasing the shutter speed will darken the background. Decreasing the shutter speed will lightenthe background.
Getting use to this technique takes some practice but is well worth the effort to learn. Not only will it save time, it will also save your back. David Ziser is a master of this technique and a visit to his blog http://www.digitalprotalk.blogspot.com/ is well worth it. Another great place to get info this technique is at the http://www.strobist.com/
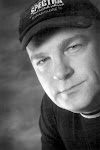


 In this image, I used two strobes in 32" reflective umbbrellas. The flashes were set on manual. The main (or key light) was placed to the subject's right. A white reflector was placed to the subject's left. I am very particular on how I set up the key light. It is crucial to the success of this type of portrait. Firstly, set the height of the light. It needs to be high enough to create shadow under the nose and chin yet low enough to light up the eye sockets and put a catch light in the eyes. Next, ensure that the light is pointing in the right direction: any light is brighter (or hotter) in the center than it is at the edges. You DO NOT want the brightest part of the light hitting your subject directly. Instead, feather the light across your subject so that the brightest part of the light actually passes in front of them. This will give the light a softer feel and a more natural wrap-around effect. Next step is the placement of the reflector. For this type of portrait I prefer to use a white reflector to avoid having speculars in the shadow of the face. The reflector should be slightly in front of your subjct and around the same height as your key or main light. The reflector bounces the light from the center of your stobe back into the shadow side of our subject. To control the brightness of the shadow, move the reflector closer (for brighter) or farther away ( for darker). The second light is placed on the same side of the subject as the main light but it is high and behind the subject. I will usually colapse the umbrella around the flash to give it some directional control. This light will give some life to the hair and separate the subject from the background. (If the subject has no hair, you may not want to use this light.)
 I set my exposre to around f4 on the highlight side of the subject. I control the exposure on the shadow side visually using the reflector. The exposure from the hair light will be the same as the main light is the subject has dark hair. I the subject has light hair, I will set the output at one stop less than the key light. The background light is just the ambeint light and is controled by changing the shutter speed. I then make a test shot and adjust the exposures to get the final effect.
 This shot was made in exactly the same way. The only difference is that it was taken outdoors. The versatility of this setup is wonderful. Once it has been practiced a couple of times, it becomes very easy to repeat, making it a great starting point for a location portrait.