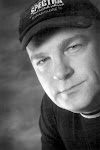
When I am photographing a portrait, I often find the background I want to use, but the lighting on the subject just isn't there. In situations like these, the flashes need to come out.
The photograph attached to this post was taken in a very narrow lane in downtown Vancouver. Sometimes, if you work near the end of the lane, you can get directional lighting, however, this stretch of wall was in the middle of the lane, giving only top down lighting t work with. The existing lighting would have created very dark shadows under the eyes resulting in a generally unpleasing image. A quick solution would have been to pull out a reflector and shine some light back into the shadowed areas, however, this would have also light up under the nose and chin, a look that I am not particularly fond of. I felt that a better solution was to pull out the flashes.
My primary light source was 2-580EX2 flashes placed inside of a 2x2 Apollo soft box. The light source was placed to camera left. The exposure was set to balance the ambient light. Balancing the flash with the ambient minimized shadows on the wall and careful placement of the light and subject all but eliminated them. The net result was a portrait that looked natural yet still light the mask of the face.
This image was taken with a Canon D6, 70-200 IS f2.8 lens at 200mm, f 5, ISO 800, shutter speed 1/60. The image was finished in Lightroom with a vignette.
Saturday, August 3, 2013
Monday, July 22, 2013
Five Lights and Two Reflectors
What I like about photographing in the studio is that it gives me total control, particularly in the way I light it. When you are on location, you need to be able to incorporate the light that exists and then add supplemental lighting to create the final image. In the studio, you start with black and add light where you want it.
Sometimes, what appears to be a simple image can prove to be quite complex from a lighting perspective. The image accompanying this post appears as a straight forward head shot. However, it took five lights and two reflectors to create the lighting that I wanted. Here's how I put this lighting together.
The primary light source, the one lighting the face, is a 3ft x 3ft soft box placed almost directly above the camera. The lighting pattern this gives on the subject is a butterfly style of lighting. Even though the light source was large, the shadows created on the face were still a little to deep. By using two reflectors below and on either side of the camera, I was able to direct light into the shadow areas that I wanted to open up. I have at times used a single reflector directly from underneath, but I found that I did not have as much control over the placement of the light.
To add depth to the image, I put a light on the background. It is very important to make this light as subtle as possible. Too bright and it becomes distractive, too dark and you will not get the separation.
This subject has very dark hair. The danger with very dark hair is that if it is not properly light, it will blend into the background and have no detail - it will just be a black, flat area in the image.. To light the hair properly took three lights - one directly from the top and one from each side. the lights were placed behind the subject with lighting controls that allowed me to carefully aim the light source and prevent the light from flaring the camera.
Five lights and two reflectors to create this head shot. But the results are well worth it.
Sometimes, what appears to be a simple image can prove to be quite complex from a lighting perspective. The image accompanying this post appears as a straight forward head shot. However, it took five lights and two reflectors to create the lighting that I wanted. Here's how I put this lighting together.
The primary light source, the one lighting the face, is a 3ft x 3ft soft box placed almost directly above the camera. The lighting pattern this gives on the subject is a butterfly style of lighting. Even though the light source was large, the shadows created on the face were still a little to deep. By using two reflectors below and on either side of the camera, I was able to direct light into the shadow areas that I wanted to open up. I have at times used a single reflector directly from underneath, but I found that I did not have as much control over the placement of the light.
To add depth to the image, I put a light on the background. It is very important to make this light as subtle as possible. Too bright and it becomes distractive, too dark and you will not get the separation.
This subject has very dark hair. The danger with very dark hair is that if it is not properly light, it will blend into the background and have no detail - it will just be a black, flat area in the image.. To light the hair properly took three lights - one directly from the top and one from each side. the lights were placed behind the subject with lighting controls that allowed me to carefully aim the light source and prevent the light from flaring the camera.
Five lights and two reflectors to create this head shot. But the results are well worth it.
Monday, July 15, 2013
More mixing Ambient light and flash
This image was done at a recent session in a clients home. We did a few shots using window light alone bit there was a very interesting piece of furniture that I wanted to use as the background. I had the client lye on the floor in front of the hutch and began photographing.

The window light coming from the glass doors created a nice light on the subjects face but the hutch went into darkness and lacked the separation needed for the subject to stand out so I had the subject move more into the centre of the room with her back toward the the window. This made the subjects face very dark relative to the hutch but gave a nice light on the hutch. It also gave that beautiful rim light that you can see in her hair. I then put a speedlight into a 2x2 Apollo soft box and used it to light the subjects face. Now I had total exposure control and was able to adjust the relative exposure of my background over the subjects face and created this image.
Using this technique allows the photographer to separately control the exposure of what is light by the window light and what is light by the speedlight. I could have easily
chosen to have the background darker or lighter but I felt that this was the best balance for the image.
The final image was tweeked in Lightroom with some skin softening and a vignette. Lightroom 5 has a new tool called a radial filter that allows the user to centre the vignette anywhere in the image. I love this tool.

The window light coming from the glass doors created a nice light on the subjects face but the hutch went into darkness and lacked the separation needed for the subject to stand out so I had the subject move more into the centre of the room with her back toward the the window. This made the subjects face very dark relative to the hutch but gave a nice light on the hutch. It also gave that beautiful rim light that you can see in her hair. I then put a speedlight into a 2x2 Apollo soft box and used it to light the subjects face. Now I had total exposure control and was able to adjust the relative exposure of my background over the subjects face and created this image.
Using this technique allows the photographer to separately control the exposure of what is light by the window light and what is light by the speedlight. I could have easily
chosen to have the background darker or lighter but I felt that this was the best balance for the image.
The final image was tweeked in Lightroom with some skin softening and a vignette. Lightroom 5 has a new tool called a radial filter that allows the user to centre the vignette anywhere in the image. I love this tool.
Friday, July 12, 2013
Mixing natural light and flash
Wedding portraits can prove to have very tricky lighting to work with. This wedding shoot was at the Brock House on beautiful sunny afternoon. The location is spectacular - on old mansion right on the beach. But, the lighting proved to be tricky.
Being mid day and sunny, the light was very harsh and top down. The result was racoon eyes and really deep shadows. Here was our solution.
First thing was to look for an area with open shade. We used a giant tree. This gave us directional light coming off the water providing a nice portrait style light. Keeping the sun behind the subjects insured that there would be no mottling on the subjects and provided an interesting texture as it filtered through the trees.
At this point it looked good but the shadows on the subjects was still too deep. A gentle fill light was provided by a Speedlite to open up the shadows and the lighting was completed. The Speedlite was on TTL and set to expose 1 2/3 stops under.
The image was converted to a toned black and white in Lightroom and a texture overlay added in Photoshop to complete the image.
Being mid day and sunny, the light was very harsh and top down. The result was racoon eyes and really deep shadows. Here was our solution.
First thing was to look for an area with open shade. We used a giant tree. This gave us directional light coming off the water providing a nice portrait style light. Keeping the sun behind the subjects insured that there would be no mottling on the subjects and provided an interesting texture as it filtered through the trees.
At this point it looked good but the shadows on the subjects was still too deep. A gentle fill light was provided by a Speedlite to open up the shadows and the lighting was completed. The Speedlite was on TTL and set to expose 1 2/3 stops under.
The image was converted to a toned black and white in Lightroom and a texture overlay added in Photoshop to complete the image.
Wednesday, July 3, 2013
Flash exercise
Last weekend I held a two day workshop on using hand held flashes or Speedlites. By the end of the two days we had created some great images and everyone walked away with a better understanding of how to incorporate their speedlites into their photography.
One of the exercises that we did was to use the speedlites as accent lights only, using another light source as the primary light. In this example, we used a window as our main light. Window light can be a very beautiful and soft light source but very often the background can get too dark. If the subject has dark hair, then you run the risk of loosing the definition between the hair and the background, ultimately creating a not so nice portrait. this first image is a good example of how nice window light can go bad.
In the next image a speedlite has been incorporated to light the background. Notice how the subject now stands out from the background and the image has a greater sense of depth to it. Also notice that as the background comes closer to the tonality of the clothes that the model is wearing, the less the clothes dominate the image.
In the final image, we put a speedlite to camera right and behind the subject. This adds a little more sepeeration to the hair and picks up more detail. The image was then reframed to eliminate more of the dress and fill the image with the subject. To finish off, in Lightroom we did some minor skin softening and added a vignette.
One of the exercises that we did was to use the speedlites as accent lights only, using another light source as the primary light. In this example, we used a window as our main light. Window light can be a very beautiful and soft light source but very often the background can get too dark. If the subject has dark hair, then you run the risk of loosing the definition between the hair and the background, ultimately creating a not so nice portrait. this first image is a good example of how nice window light can go bad.
In the next image a speedlite has been incorporated to light the background. Notice how the subject now stands out from the background and the image has a greater sense of depth to it. Also notice that as the background comes closer to the tonality of the clothes that the model is wearing, the less the clothes dominate the image.
In the final image, we put a speedlite to camera right and behind the subject. This adds a little more sepeeration to the hair and picks up more detail. The image was then reframed to eliminate more of the dress and fill the image with the subject. To finish off, in Lightroom we did some minor skin softening and added a vignette.
Tuesday, October 2, 2012
Gallery Opening
Hi Folks
Many of you know that I have been working on putting together a gallery that will show the work of local artists. Well that gallery has now come together. The first opening is on October 12, 2012 and it promises to be a great evening. Here is some information on the show. Hope to see you all there.
Tuesday, September 11, 2012
Focal Point
I believe that education in photography is essential if we want to keep up with the ever changing technology and still maintain photography as a viable art form. Today there are many non traditional ways to learn about photography, particularly on line. A quick search on the internet will show literally millions of sites that are dedicated to teaching you how to photograph. Some of them, like the New York Institute of Photography, can prove to be a viable way to learn photography as an art. However, most of them fall well short.
The best way to get a photography education is to work with a instructor in a structured program that has well defined learning outcomes so that at the end of the process you walk away with a well rounded foundation in photography. Places that do this well are hard to find.
Focal Point Visual Arts Centre has been providing this level of quality education in Vancouver for 39 years. This month, we will be loosing Focal Point. As an alumnae of Focal Point as well as one of its instructors, I know that it will be missed.
I want to take this opportunity to thank Focal Point for being a big part of my photography career and to wish all the best to my students and the staff.
The best way to get a photography education is to work with a instructor in a structured program that has well defined learning outcomes so that at the end of the process you walk away with a well rounded foundation in photography. Places that do this well are hard to find.
Focal Point Visual Arts Centre has been providing this level of quality education in Vancouver for 39 years. This month, we will be loosing Focal Point. As an alumnae of Focal Point as well as one of its instructors, I know that it will be missed.
I want to take this opportunity to thank Focal Point for being a big part of my photography career and to wish all the best to my students and the staff.
Subscribe to:
Posts (Atom)


